What are resources?
For each of the Eloquent models you wish to use with Runway, you’ll need to define a ‘resource’. A resource basically tells Runway about the model and how you’d like it to be configured - which blueprint to use, whether it should be manageable in the CP, etc.Defining resources
There are three steps involved in defining a resource:1
Add resource to config file
Add the resource to Runway’s config file. The key should be the model, and the value should be an array of configuration options:
config/runway.php
2
Add HasRunwayResource trait
Add the
HasRunwayResource trait to your Eloquent model:app/Models/Order.php
3
Edit the blueprint
Finally, you can start adding fields to your resource’s blueprint. To learn more about using Blueprints in Runway, please review the Blueprints page.
Configuring resources
There’s about a dozen configuration options available for resources, they are all documented below.Hidden
By default, Runway provides a Control Panel interface for managing your models. If you’d like to hide the CP Nav Item that’s registered for this model, just say so:Route
If you want to take advantage of Runway’s front-end routing abilities, you can pass in aroute to enable it.
Your route can include Antlers code - the variables available are driven by the resource’s blueprint.
Templates & Layouts
You may also specify thetemplate and layout you want to use when front-end routing.
Read Only
You may also specify if you want a resource to be ‘read only’ - eg. users will not be able to create models and when editing, all fields will be marked as read only and no save button will be displayed.Duplicatable
By default, Runway allows models to be duplicated via the Duplicate action in the Control Panel. You can disable this for a resource by settingduplicatable to false.
Ordering
Sometimes you may want to change the order that your models are returned in the Control Panel listing table. You can use theorder_by and order_by_direction configuration options to tell Runway the order you wish models to be returned.
Title field
When Runway displays models inside inside the Control Panel (eg. in relationship fields, in search), it’ll default to showing the first listable field it can find, based on your blueprint. If you’d like to specify a different field, you may do so by setting thetitle_field option on your resource.
Search Index
Thesearch_index option allows you to specify a search index which should be used when search models in the Control Panel listing table.
Eager Loading
To help with performance, Runway will automatically “eager load” any Eloquent relationships it knows about based on the fields you’ve defined in your blueprint. However, if you wish, you can override the relationships that get eager loaded by providing thewith option on your resource:
Publish States
If you’re writing content that you would like to be able to store without publishing right away, you can add thepublished config option to your resource’s config array. It’ll allow you to have published & unpublished models, with all of the status indicators and filtering you’d expect.
published column in the database to keep track of the model’s “status”. You’re free to change the name of this column as needed.
Runway won’t automatically add this database column for you, you will need to add it yourself:
Prevent creating new models
If you want to prevent new models being created via the Control Panel, you can mark the resource’s blueprint as “Hidden”:Actions
In much the same way with entries, you can create custom Actions which will be usable in the listing tables provided by Runway. You can register them in the same way as you normally would. The only thing that’s different is the fact that instead of filtering down to justEntry objects for example, you can filter by your model, like Order.
Queries
Every query made by Runway to your model will call therunway query scope. This allows you to easily filter the models returned by Runway.
runwayListing and runwaySearch scopes documented on the Control Panel page.
Disabling global scopes
By default, Runway will observe all global scopes registered on your model. However, this might not be ideal if you want to access, for example, soft deleted models in Runway. You can work around this by calling thewithoutGlobalScopes method in the runway query scope:
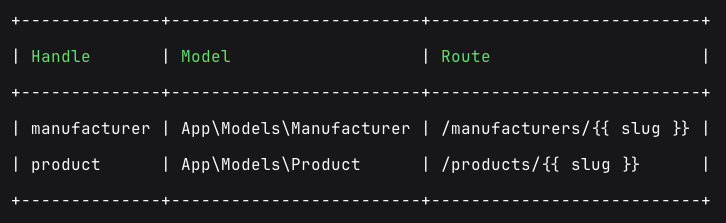
List of Resources
If you’re unsure about the handle of a resource, you may want to check it. You may do so with thephp please runway:resources command which will display a list of Runway Resources.